Step 64 - Understand the Stain
 Know what you are trying to demonstrate with the stain you are performing.
 Just “following the method” and not really knowing what should be seen in the finished section will lead to poor results.
A section of liver stained with PAS. Lipofuscin and glycogen are PAS positive while traces of bile and hemosiderin are PAS negative and appear in their natural colors (yellow and brown respectively).
B This section shows an opportunistic fungal infection in lung (Aspergillus) stained with the Grocott-Gomori method. Fungal hyphae are black as is unstained carbon, a common feature in the lungs of smokers and most city dwellers.
 |
Step 65 - Use a Positive Control
Always use a control slide known to contain the structure/ substance you are trying to demonstrate.
“If the structure/substance we are staining for is not visible in a slide we assume it is not present.”
A section of cirrhotic liver stained with Perl’s method to demonstrate iron-containing hemosider in (blue). This would make a satisfactory control block for iron stains.
 |
Step 66 - Use Accurate Timing
Use accurate timing.
Timing is always approximate. Inaccurate timing produces inconsistent results.
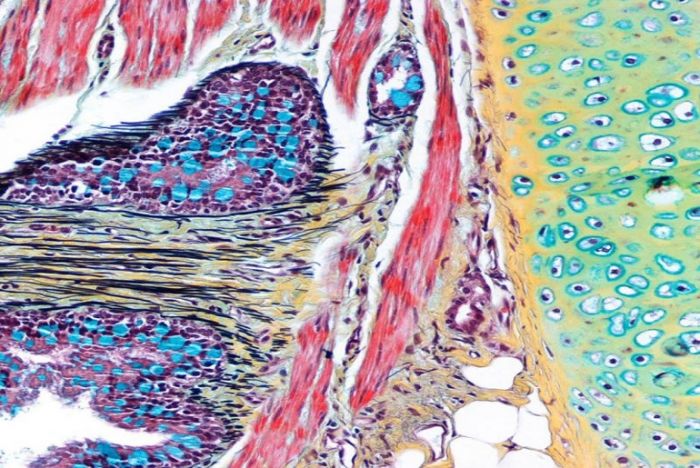
Both these sections of skin from the same block have been stained with the PAS method. Section A was treated with periodic acid (oxidation step) for 5 minutes where as section B had only 30 seconds (a mistake). Note that the basement membrane is very poorly stained in section B as a consequence.
 |
Step 67 - Consider Reagent Stability
Be aware of the shelf life of the reagents you are using. Some reagents or dye solutions deteriorate slowly while others are very unstable and must be made up fresh and used immediately. Others have to be left for some time to oxidize (ripen) before they can be used at all.
We assume all reagents can be used for an indefinite period.
Muddy Weigert’s hematoxylin due to overoxidation. Note the brown staining of collagen.
 |
Step 68 - Store Reagents Correctly
Store reagents correctly. Some require refrigeration because they are inclined to support the growth of fungi or molds. Others are light sensitive and require storage in the dark.
“All our reagents are stored on the shelf above the staining bench. Sometimes we see stray organisms in our sections.”
This section shows large deposits of extraneous microorganisms which have grown in the staining solution (in this case hematoxylin) then been deposited on top of the section.
 |
Step 69 - Adhere to the Method
Follow the protocol exactly.
Staff members achieve different results when supposedly using the same protocol.
These sections of formalin-fixed submucosa have been stained with Masson trichrome stain. Section A shows red smooth muscle. In this case the stain was performed correctly following the lab protocol and including a preliminary chromic acid step (sensitization or secondary mordanting). This step was overlooked when section B was being stained. Note the lack of differential coloration of muscle in section B (intestine).
 |
Step 70 - Record Any Changes
Document any departure from the method you are using.
Sometimes when results are poor it is difficult or impossible to work out why because protocol changes have not been recorded.
In this silver impregnation stain for reticulin the fibers are poorly demonstrated and there is a background scum (precipitate) on the slide. It is very difficult to determine the cause of such a problem if the method has not been followed exactly (Gordon & Sweets method, kidney).
 |
Step 71 - Standardize Washing Steps
Take particular care with washing steps. Standardize them as far as possible as they are frequently the cause of variable results.
Lab staff members use different washing techniques – some use vigorous agitation, others are much more gentle.
These liver sections were stained by the same method. The only difference between them was the technique by which they were rinsed between impregnation and reduction. The reticulin fibers are black and better defined in section A (Gordon & Sweets method).
 |
Step 72 - Set Up Microscope Carefully
Use microscopic control at crucial stages such as differentiation steps. Be aware of the effect of the microscope setup on the appearance of un-coverslipped (wet) sections; it can produce the appearance of false background staining.
For all methods the level of staining is assessed by looking at the slide with the naked eye.
A Wet section (no coverslip) viewed under a microscope with closed condenser diaphragm. Note the false background.
B Wet section (no coverslip) viewed under a microscope with open condenser diaphragm. Note the clear background.
 |